
Lavatory Renovation Guidelines: Whether or not you’re updating outdated finishes or doing a full interior renovation, staying organized is the key to a stress-free and profitable transform.
These step-by-step lavatory renovation guidelines will guide you through each section so that nothing will get missed along the way. Let’s flip that restroom into the stress-free, purposeful retreat you’ve been dreaming of.
Step-by-Step Lavatory Renovation Guidelines
Pre-Renovation Planning

Earlier than you really begin your bathroom renovation, it’s essential to make a couple of key selections. It’s essential to resolve these items earlier than you begin with a view to saving money and time.
1. Outline Your Renovation Objectives
Determine what sort of enhancements you’ll make, model improvement, improved storage, structure adjustments, full intestine, and transformation.
This step is essential as it would enable you to outline a budget, timeline, and whether or not you will need to rent any external assistance.
2. Set a Reasonable Fund
Do you know the common price to renovate a toilet is $6,600 to $17,600, with a nationwide average $12,000.
These estimates are clearly not speaking about small Lavatory Renovation Guidelines, lavatory makeovers, or easy lavatory updates.
It actually is determined by the inside track of your renovation. We tackled a half-lavatory makeover a couple of years ago for simply over $1,000. Earlier than that, I did a fast and straightforward beauty lavatory makeover for simply $100!
Our present lavatory makeover, although it is a whole renovation and transformation, will cost us properly into the hundreds by the time we’re completed. For this lavatory renovation, we created a $20,000 fund that we are attempting to maintain.
At all times, keep in mind when making a budget so as to add 10-20% for unexpected expenses. It’s always better to have budgeted an excessive amount than too little.
3. Determine: DIY, Rent Execs, Or A Mixture Of Each?
Relying on what your renovation will embody, you might or might not need to bring in the professionals.
Some lavatory renovation duties are DIY-able, like painting, swapping out taps, and updating lighting fixtures.
Some lavatory renovation duties are just a little bit extra difficult; however, if you are decently useful and can be taught from YouTube, you’ll almost certainly be able to deal with them. This includes issues such as tiling the ground, changing a conceit, and incorporating a backsplash or wall paneling.
In our present lavatory makeover, we’re doing all the pieces ourselves, besides installing the stone that surrounds our new bathtub. Quite a lot of these initiatives we’ve never tackled before; however, we’ve been finding it hard to learn, as a result of bringing in professionals being a huge financial hit.
That being stated, by no means try to do something you’re completely not comfortable with.
4. Measure all the pieces
Measure completely all the pieces in your lavatory and hold these measurements in a notes file in your cellphone for fast entry.
Some key issues to measure include: self-importance space, ground/bath tile square footage, mirror space, ceiling height, and the overall space of the bathroom, among others.
Having these measurements available is obligatory for design and planning.
5. Analysis Of Native Permits And Construction Codes
Mandatory permits and construction codes ought to always be checked at your state/county level.
These embody issues like:
- Bogs want at the very least one wall receptacle outlet inside 36 inches of every bathroom basin’s edge.
- All lavatory receptacles require GFCI safety.
- Retailers need to be on a devoted 20-amp circuit.
- Bogs and bathroom rooms require airflow through an openable window with a display or a mechanical system.
At all times, make sure you apply for any obligatory permits and work within your area’s building codes.
6. Create a Tough Timeline
It’s always a good idea to create a detailed timeline of your bathroom renovation before you begin. Clearly, life occurs, and generally timelines get pushed again; however, it’s nonetheless good to have at the very least some estimate.
Take into account issues like:
- The time it takes to order/ship new {hardware}, tile, vanities, and many others.
- Contractor availability and job time estimates
- How huge can the demo course of the/dumpster supply be?
- Upcoming vacations or times when you won’t can work on the mission
At all times determine in just a little extra time than you suppose the mission will take. It’s always better to complete a renovation earlier than the deadline than after.
For our lavatory renovation, we created a tough timeline of three months. We’re now two weeks in and shifting steadily to date.
7. Take “earlier than” Images
Even for those who don’t plan on sharing these earlier pictures with anybody else, you’ll want to have them. It’s so rewarding to see how a lot progress you made!
Design & Fashion Course
1. Select a Design Fashion
Store my favourite lavatory self-importance finds right here!
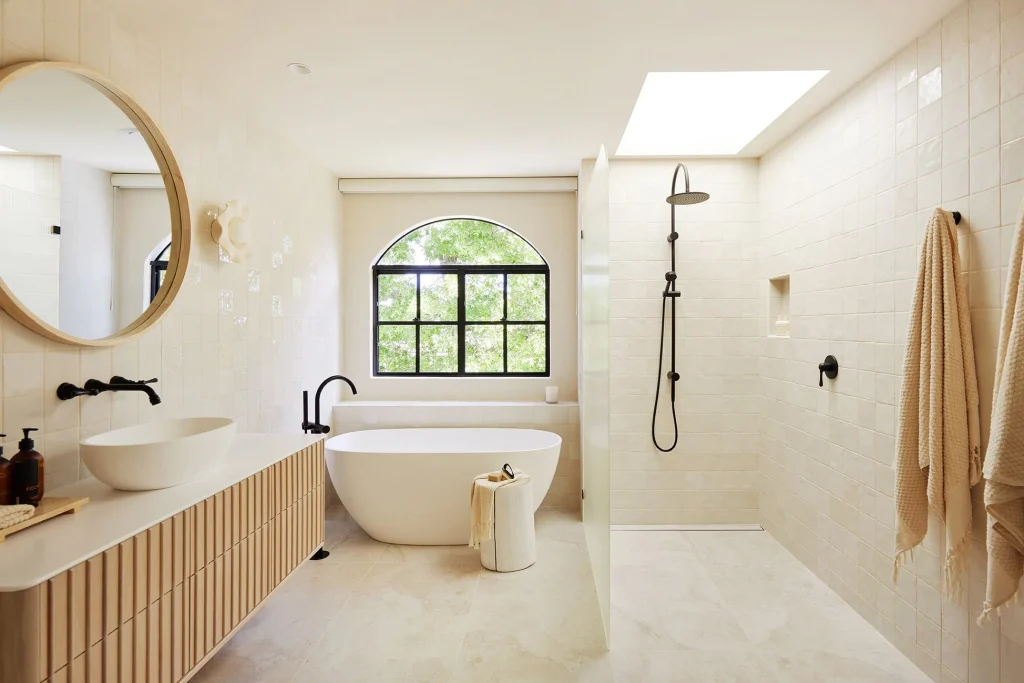
Selecting a design model for your lavatory will enable you to make all the other choices that are important to select during a toilet renovation.
Some popular bathroom design styles are traditional, modern, farmhouse, and spa-like.
There are numerous design styles to choose from; however, I recommend matching the design style of your house. Then analyze that design model and see what paint colours and {hardware} finishes are typically used.
2. Decide a Colour Scheme
Once more, strive to select colours that can circulate naturally together with your house’s present colour palette.
The colour can even rely upon the temper you need to go for within the bathroom. If you’d like a lightweight and ethereal spa-like lavatory, select lighter colours. If you’re going for daring, select darker, deeper-toned colours.
It doesn’t matter what, at all times pattern the colours in your precise lavatory. Bear in mind colours by no means look the same as they do on the paint chip. It’s worthwhile to take a look at them in your rooms, pure light.
3. Choose Finishes and Supplies
Store my favourite lavatory tile mixtures right here!
That is the time to decide on issues like tile, countertop, flooring, and many others.
For flooring ceramic and porcelain tiles are widespread for his or her sturdiness, water resistance, and straightforward upkeep.
Laminate, quartz, strong floor, tile, and pure stone are widespread decisions for countertops, with choices like granite and quartz being notably widespread for his or her sturdiness.
{Hardware} finishes even have a variety, depending on the model you’re going for. Don’t neglect it’s okay to combine and match {hardware} finishes additionally. Not all the pieces must be the same colour.
4. Plan Structure and Storage Options
If you’re embarking on a toilet renovation that involves relocating certain options, be sure to consider the existing plumbing.
Shifting plumbing throughout the room is usually a large job and adds a huge amount of cash and time to your budget.
If, in any respect, attainable, choose to depart the structure related and substitute the fixtures and {hardware} in these places.
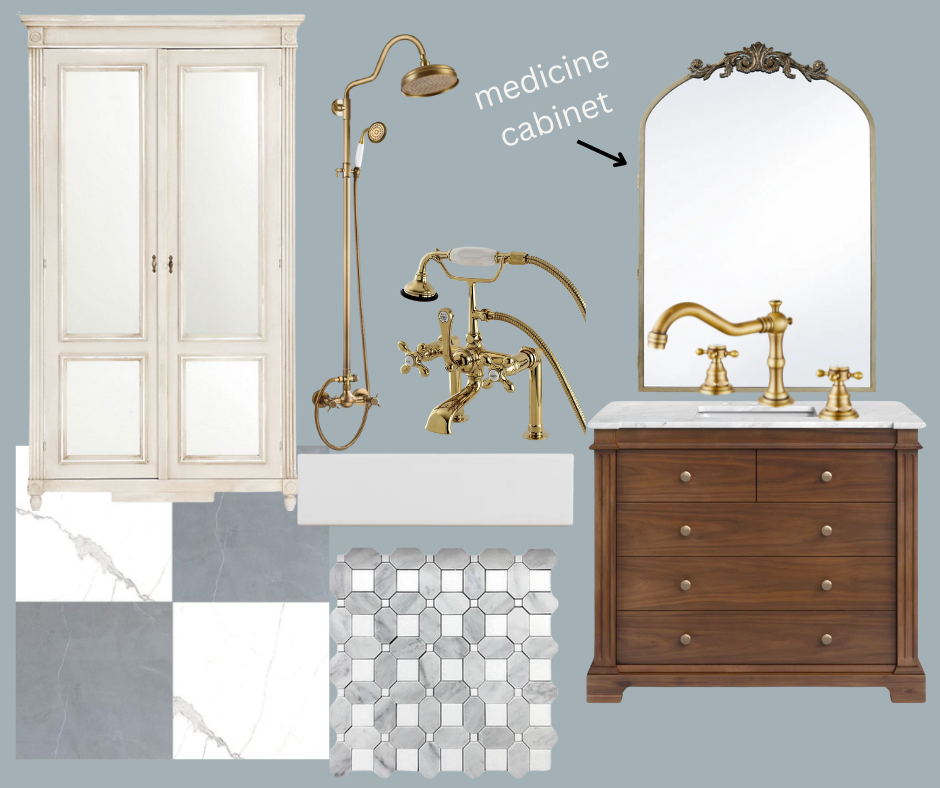
5. Use a Design Board to Deliver Your Imaginative and prescient Collectively
Store our lavatory design board right here!
I always begin each renovation with a design board.
It’s the most effective and easiest method to verify that all my decisions are communicated properly.
I like to make use of Canva to create my design board. I add screenshots of all my decisions and paint palette to it.
It doesn’t need to be fancy, simply one thing to reference and hold your design decisions organized.
Professional tip: Save your concepts on a Pinterest board for fast reference!
Demolition and Prep
Lastly, it’s time to really begin engaging in the lavatory renovation!
Bear in mind to put on all the suitable protective gear like gloves, safety glasses, and masks when obligatory.
(As we deal with each of those initiatives, I’ll hyperlink a tutorial or video on how we accomplished it)
Right here is the order that every section of demo and prep ought to happen in:
- Flip off the water and electrical energy
- Take away previous fixtures, tile, flooring, and drywall (as wanted)
- Safely eliminate particles
- Examine for mildew, rot, or water harm
- Prep subfloor and partitions for the subsequent section
Throughout our lavatory renovation, we needed to eliminate and replace the subfloor fully because it was so water-damaged. Fortunately, we figured that into the funds because we were conscious that there was some water damage; however, it was positively more intensive than we thought…
Plumbing And Electrical
Subsequently, it’s time to deal with the electrical and plumbing.
(As we deal with each of those initiatives, I’ll hyperlink a tutorial or video on how we accomplished it)
That is the order the plumbing and electrical needs to be tackled:
- Reroute or replace plumbing for those who’re altering the structure
- Add or transfer shops and lighting fixtures
- Set up a new fan or air flow system
- Schedule inspections if required in your space
Don’t neglect to deal with initiatives solely you’re comfy with.
A choice if you wish to do DIY-ing these duties by yourself is to hire someone to return and ensure you’re employed. This can be less expensive and provide you with valuable insight.
Partitions, Flooring, and Waterproofing
Now that the plumbing and electrical are taken care of, we are able to transfer onto the wall, flooring, and waterproofing.
(As we deal with each of those Lavatory Renovation Guidelines initiatives, I’ll hyperlink a tutorial or video to how we accomplished it)
Right here’s the order these lavatory renovation duties ought to happen:
- Set up cement board or moisture-resistant drywall
- Waterproof bath and tub areas
- Add heated flooring components
- Lay ground tiles or waterproof flooring
- Tile partitions if wanted (and don’t neglect the grout)
- Paint with a mildew-resistant lavatory paint
Set up Fixtures and Options
This portion of the WC Lavatory Renovation Guidelines is when all the pieces begin to return collectively.
(As we deal with each of those initiatives, I’ll hyperlink a tutorial or video on how we accomplished it)
Right here is the order in which these lavatory fixtures and options need to be put in:
- Set up self-importance and sink
- Mount the bathroom
- Add bathe/tub {hardware}
- Hold mirrors, towel racks, and cabinets
- Hook up lighting and plumbing
Bear in mind to check any newly added {hardware} for leaks.
Add Ending Touches
Lastly, it’s time to button up the lavatory renovation and add all of the finishing touches.
- Add ornamental storage or open shelving
- Lay down rugs and mats
- Fashion with crops, candles, artwork, or baskets
- Contact up paint and caulk
- Snap these “after” pictures!
Remaining Walkthrough And Clear-Up
The powerful stuff is finished, now it’s time to do your ultimate walk-through and Lavatory Renovation Guidelines clean up something you used.
- Take a look at the water strain and electrical
- Repair minor imperfections
- Deep clean each floor
- Have fun, you probably did it!

Need the Free Step-by-Step Lavatory Renovation Guidelines?
I’ve created a free downloadable model of these guidelines in a cute, clear design—good to print and verify off as you go. Click on right here to seize the Lavatory Renovation Guidelines PDF.
DIY Lavatory Renovation
Let me know what you think of these lavatory renovation guidelines and how much lavatory renovation you’re planning on tackling! Whether or not yoplease u’re updating outdated Notebook finishes or doing a full interior renovation.
